• Home
  • About
  • Contact
  • LESUIF SHOP
  • Nav Social Icons

  • Skip to primary navigation
  • Skip to main content
  • Skip to primary sidebar
  • Skip to footer
  • Home
  • About
  • Contact
  • Mobile Menu Widgets

    Connect

    Search

    Connect

Paris +  June

Paris + June

Home + Life on Purpose!

  • All Posts
  • Lifestyle
  • Habits
  • Organization
  • Projects
  • Travel

How to make a Cheap Wood Sign in 13 Easy Steps

In: DIY

Want to learn how to make a cheap wood sign? You’ve come to the right place.   

Maybe you’re a little like me and you like to give gifts that have some meaning. This post is for you. Here is how to make a cheat wood sing in 13 easy steps. Not only does this gift have meaning, it’s easy on the budget and can be customized.

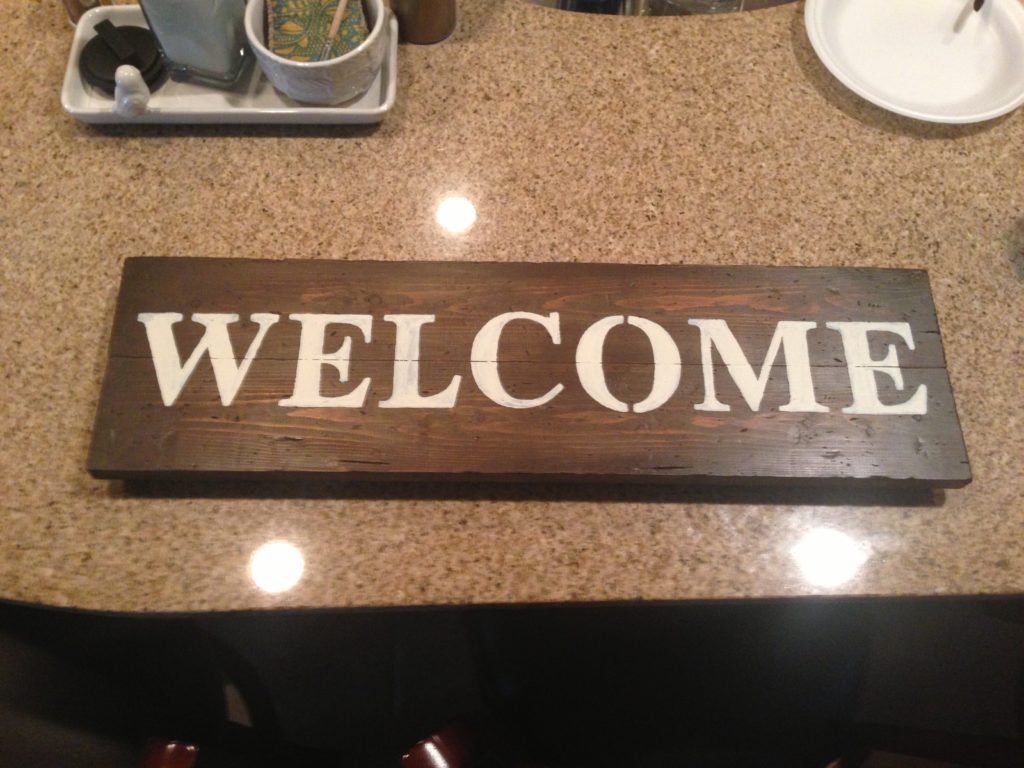
When my brother-in-law built his barn, I wanted to make him a sign that went with his new man cave.  A “Welcome” sign was perfect.  This DIY is simple, cheap and the result is unique. He really liked it so I figured I’d share with you.

PROJECT DETAILS

DIMENSIONS: 1in X 8in X 24in.

COST: When I made this sign, it didn’t cost me a dime because I already had everything I needed. However, I will break the costs down for you and if you need to purchase all the supplies listed below then expect to pay approximately $26. The price listed is for buying an entire container of wood glue, stain, paint, and polyurethane. When finished, you will have all of the supplies purchased like new because this project doesn’t require much.

TIME: The project will take approximately 12 hours total. Now I know that sounds like a lot of work, and you probably think “I don’t have that kind of time” but trust me, 95% of it is drying time. I completed this on two weeknights.  On a Wednesday evening after work, I looked through my wood pile, picked the what I needed, and asked Cecil to cut it for me. He had that cut in two minutes. Probably took him longer to plug in the miter saw. I then sanded, stained and set aside to dry while I finished cooking dinner. Don’t feel pressured to wait around while this project dries. Put a load of laundry in the washer, cook dinner, and don’t stop what you have going on. It is a super easy project for a small price. That’s what I call, a Win-Win!

TOOLS

  • Ear Plugs. When cutting wood, I recommend protecting your ears. The machines are loud and can damage your hearing.
  • Safety Goggles. Your eyes are delicate and protecting them should be a priority; especially when cutting wood.
  • Miter Saw to cut the wood board to the precise measurements.
  • Sanding Sponge to sand the edges of the wood board.
  • Dense Foam Paint Brush to paint the letters on the wood, which I bought at Michael’s, but here is a similar one.
  • Plastic letter stencils. I found mine at Hobby Lobby a long time ago, and I remember using their coupon. Win!
  • Pencil to mark your measurements.
  • 2 Rags or cut up parts of an old T-shirt. These are one for staining, the other for wiping on polyurethane.
  • Old sock. You know you have one of those long-lost soles somewhere.
  • Nails, screws, nuts, and bolts (handful). You could use a chain. I didn’t have one, so I improvised.
  • Drill, to make two holes when you’re finished.

SUPPLIES

Most of our supplies we bought at Lowe’s, Michael’s and Amazon because it so happened at the time were a better price in comparison to other stores.  A couple of times, I was able to purchase what I needed online and pick up at the store on my way home from work. Time saver!

  • 1 Wood board – 1in X 8in X 8ft.
  • Stain. Here is the exact color I used.
  • Paint (whichever color you prefer)
  • Wipe-on Polyurethane, which I bought at Lowe’s for a previous project.  But you can buy it on Amazon.
  • 1/2 yard of twisted jute twine in whichever color you prefer. I went with natural. Buy the exact one on Amazon.
  • *Wood glue: Only if you are joining two pieces of board to make the sign tall enough. I’ll explain below. Here is the exact one I have.

INSTRUCTIONS

  1. Measure the wood board. For this particular project, we want our sign to be two feet or twenty-four inches long. Make a mark with your pencil. Remeasure, to be sure. Take it from my husband’s grandfather, a carpenter, who always says “Measure twice, cut once.”
  2. On the marking, make the cut.
  3. *If the original wood board is 1in X 8in, skip this step. The boards I had on hand were 1in X 4in which meant I had to glue both boards in order get the measurements I needed. If this is your case, then glue the two boards together and let them sit overnight. A few hours will work. However, I wanted to make sure they would “stay together.” (singing) 
  4. The creative part begins. Pick whichever stain color tickles your fancy and stain that puppy. Let each coat sit for 3-6 hours. Two layers of paint will make the stain color richer. For my sign, I did two coats of gel stain I had on hand.
  5. Optional. Hold on to your goggles. Give the wood board some character by beating it up with a sock full of nails, screws, nuts, and bolts. (Fun, until the sock can no longer hold together, breaks open and nails bolts and everything else attack from all angles!) It’d be fun they said! Take a few deep breaths after beating-up the board. “Ahhh!” Don’t you feel better? That’s a stress reliever for sure. All kidding aside, please be careful. Maybe double up the sock once you notice a few holes.
  6. Paint the corners black to give the board more depth. Using the dense foam brush, stroke with pressure on the edges and lighter pressure towards the center. This procedure provides the lettering a focal point by fading into the center. When finished, wash the brush and let it dry.  Allow a few hours for the paint to dry.
  7. Using the same brush, apply a light coat of white paint all over the board. Remember, soft strokes. This step softens the look of the board and makes it look washed almost. Dry for approximately 3 hrs.
  8. After, sand it.
  9. Outline the letters using the plastic letter stencils. Yippee!
  10. Once outlined, get to painting! Pick another color and paint inside the outline. Let the paint sit for a few hours.
  11. When the letters are dry, put a coat of polyurethane over everything to protect your hard work. Allow time for drying.
  12. Drill two small holes at the top corners for hanging. You can choose other hanging tools, but I chose twine because it was what I had on hand.
  13. Pass the twine through the holes and make a knot. Hide the knot behind the sign

Congratulations! The last step sealed the deal to you joining the DIYer gang. That wasn’t so bad, right?  If you completed this project as a first time DIYer, it means you took a chance on something new, and a pat on the back is deserved.

My brother in law loved the sign.  Now the “Welcome” sign has a good home and it put a smile on the owner’s face.

In the future, use this DIY tutorial to make any small wood sign for your home.

Here is the only photo I was able to find. Courtesy of my iPhone 6!

Wood DIY sign

Turning it over to you.  What DIYs have you attempted? Brag about your projects in the comments below, because after all that hard work, you have bragging rights!

If you enjoyed this post, share it with your DIY buddy and build one together. As always tag me in your DIY results.

Thank you so much for reading!

With love and gratitude,

By: Abril · In: DIY

you’ll also love

How to make a No-Sew Tulle TuTu in 8 Easy Steps
Board and Batten In 12 Easy Steps
10 Easy Steps to Stunning Outdoor Patio Lighting

Join the List

Stay up to date & receive the latest posts in your inbox.

Reader Interactions

Leave a Reply Cancel reply

Your email address will not be published. Required fields are marked *

Recipe Rating


Next Post >

How to make a No-Sew Tulle TuTu in 8 Easy Steps

Primary Sidebar

Hello you!
I'm Abril. A hopeless optimistic and free-spirit who loves life, adventure and the universe. Welcome to my world and creative outlet where I blog part-time from Houston Texas. My purpose with this blog is to spread positivity, encouragement, and knowledge to ultimately help you find gratitude, mindfulness, joy and purpose in each day! May today be your best day yet!

Featured Posts

Easy Peach Biscuit Sandwiches

Easy Vegetable Recipe + Casserole Idea

Painted black fence

5 Key Tips To Know Before Painting Your Fence

Search

Archives

Advertise

SiteGround Ad

Connect

join the list

@ParisandJuneCo

parisandjuneco

Abril | Paris + June Co.
I miss you Charlie! My best friend has been gone I miss you Charlie!

My best friend has been gone for over 6 months. 💔 

Grief is heavy! But it's necessary. 

You don't heal. Instead you learn to walk around daily with a hole in your heart. 

You learn to accept and to cope. 

And if you let it, it will transform you to a more grateful being.

Charlie was 12 years young and will forever live vivaciously in my heart!
People spend their whole life waiting to start liv People spend their whole life waiting to start living.

I see it everywhere. Waiting for the weekend. Waiting for vacation. Waiting and waiting. 

The truth is, you can live in the now. Right now is the only moment you truly have. If you blink you might miss it. 

So breath in deeply. Embrace a little longer. Laugh a little more. Spend time with the people who matter, who love you, who welcome you with open arms. Eat good food. Use the new dishes. Pop open that expensive bottle of wine. Wear the red dress. 
We are only in this world for a short time so make the most of every momento and Live! Truly live wherever you are, with whomever you are. 

For right now is the only moment we have. And this is where our choices landed us. 

Live! Just live my friend. ❤️
Grateful. Joyful. Purposeful. Powerful. Fearless Grateful. Joyful. Purposeful.  Powerful.  Fearless. Mindful. Present. Meditative. Deep. Energy.  Light. Upbeat. Unique. Eccentric. Wonderful. Incredible. Creative. Smart. Bright. Loving. Caring. Curious. Those are a few of the words I think about when I think of you and what you could be. 

You can be anything and everything you want to be. Because only You have the power to manifest the life you want for yourself. You are not a victim and You are free.

You, my friend, are pure magic. You were wonderfully made too. Rejoice in the light within and let it shine. 

❤️❤️❤️

#shinesobright #iam #becomewhoyouare #letyourlightshine
When will it be enough? This question has echoed When will it be enough? 

This question has echoed in my head and resonated in my bones the past months. It’s the reason I’ve disappeared completely from the gram but I wanted to share because it’s important. 

When will it be enough? When will you have enough clothing, shoes, house decor, money, things that don’t have meaning and material wealth? When? 

The true joy of BEING, is the only thing that matters. Existing in this very moment, without hesitation or worry or whatever else that plagues you. Just BEING! 

So many are constantly looking outside of themselves for pleasure, fulfillment, validation, security or love without reflecting , or stopping to breath, and to realize all those things are already within.

Stop what you’re doing, take a deep breath, and ask yourself, WHEN, WILL IT BE ENOUGH? 

#reflecting #being #wakeuptoday #lifeissomuchbigger #beingbringsjoy #presentmoment #concious
To get your act together, get clear on which direc To get your act together, get clear on which direction you are heading! 

Where are you aiming? Can you picture it? 

Just because you have sight does not mean you have vision. 

I’ve seen the word “Intentional” thrown around social media with weird captions that indicate no actual soul searching happened. 

Copying someone, does not mean you’ve learned the meaning of what Intentional means. It just shows you haven’t tapped into your higher self.

Instead of grasping for a catchy headline that will get you more likes because it’s the new trendy thing, do the work and share from a place of authenticity. 

You will find authenticity when you decide which direction you’re headed in life, and pursue it regarles of what stands in your way.✨
Arie’s new friend, Pippa. Custom made by the t Arie’s new friend, Pippa. 

Custom made by the talented @ikibondo

Can’t wait to see my daughter play with this adorable doll. 

My girl’s things are slowly taking over our house, including small toys. But I am trying really hard to keep it to a minimum by mindfully choosing toys and baby gear. 

How do you keep the chaotic collection of baby/kid stuff to a minimum?
My sweet Arie, you are the most beautiful blessing My sweet Arie, you are the most beautiful blessing, the most precious miracle, the greatest adventure, the best gift, and worth the longest wait!

You’ve filled my heart with more love and joy than I ever thought imaginable! 💗 

I feel incredibly grateful to be a part of your sweet tiny life, and look forward to watching you grow and guiding you through it all. 

My cup runneth over! 

Being present and mindful has helped me take in motherhood with grace. I am soaking in all the adorable smiles, the sweet new baby smell, the tiny hands and feet, the cries, the sleepless nights, the new experiences and the most beautiful little face and soul.

Te Amo con toda mi alma, mi ser y corazón, Arie, hija mía! Asta el infinito y el más allá! 💗
Happy Birthday month to our Tiny baby girl! 💗 Happy Birthday month to our Tiny baby girl! 💗

If you’re a first time parent, and excitedly/nervously awaiting the arrival of you new baby, here are a few things you can do to prepare in the last few weeks. 

1. Make a checklist of last minute things needed in the house or for the baby. (Examples: Cleaning products, laundry detergent, pool supplies, food). Then check a minimum of three off your list daily. 

2. Sanitize all baby bottles. Maintain a semi-organized home by assign a small area for baby items in each part of the house (Example - kitchen: bottle cabinet, bathroom: baby towels and products) 

3. Make an effort to mindfully enjoy your time with your partner. Your lives are about to change. Things will be different.  Good at times and chaotic other times. Take time to appreciate the journey you’ve had together up until now. 

4. Talk with your partner about routines and traditions you want to establish with new little family member. It’s important for us to establish a daily reading routine with our baby girl. We’re not sure when we will start but we’ve discussed a few different options. 📚

Cecil and I have been taking it easy lately. We feel beyond excited to meet our baby girl! And to be quite honest, I am also feeling a bit nervous, mainly because the “mother” role is a completely new concept to me. But with grace, mindfulness, preparation, the great network of women around me, and prayer, I am confident motherhood will also be a very fulfilling part of my journey.

Preparing with the list of things above has brought me peace of mind the these last few weeks.

What is one piece of advice you have for new parents to be?

#newparentstobe #babygirlontheway #motherhoodjourney #importantthings #lifeisbeautiful #mindfullymade #mindfulnesspractice #gratefulheart #gratefuleveryday #pregnancyjourney #familytraditions #birthdaymonth🎉 #newparents #maternityphotoshoot #pregnantstyle #soontobeparents #awaitingbaby #tinylife #parisandjuneblog #parisandjunephotography #theplacesyouwillgo #bestadventure #ouradventurestogether
Follow @Parisandjuneco

Footer

On the Blog

  • Habits
  • Lifestyle
  • Organization
  • Projects
  • Germany

Info

  • About
  • Contact
  • Terms Of Use

stay in the know

Paris + June Copyright © 2025

error: